Wednesday, August 29, 2012

Doodling for screens

I've been doodling at night again. There's nothing to watch on TV!

This beautiful design was done by Margaret Applin of Scrap WisdomCollage.

Scrap Wisdom Collage

She used Photoshop to alter and repeat one of my simple doodles from my last post. I wonder if your can figure out which one.
I'm planning to have her make me a screen or two to use on my fiber art. I love the one on the left.

What do you think of this one? I think it's beautiful and can picture using it in my prints on fabric or paper. It also came from the last post.

Monday, August 27, 2012

Meandering

I got the quilting on the baby quilt all removed and today I ironed the pieces and made sure all the little threads were picked out.
I've gotten about a quarter re quilted with a meandering stitch. I think that is better than straight lines as it doesn't highlight any imperfect seams that a beginner might make.

Last night I was doing some doodles trying to come up with some ideas for a screen that I want to get made by Margaret Applin of Applin Designs.

http://scrapwisdomcollage.blogspot.ca/

I plan to do one quadrant and then using Photoshop, I will have Margaret make a repeating tile design for a screen.

I think I like the one on the left in the last picture. With some more doodling it may completely change.
Also, after doing a couple I looked up Moorish designs on the net and got lots of ideas.

Sunday, August 26, 2012

Some ripping and some knitting

I know I haven't blogged for a few days, but I've really had nothing blog worthy to write about. I'm well stocked at the craft shop and I'm in a bit of a creative lull, looking for my next project. I'm kind of feeling that I need some new creative inspiration so I signed up for a course with Dion Dior at Joggles on using the new Silk acrylic paints. Lesson one is up but I'm waiting for the paints.

http://www.diondior.com/

This is the first quilt of my son's girlfriend's mom. She tried to machine quilt it herself but ran into trouble. I offered to quilt it for her but first I had to spend some time snipping yesterday. Straight line quilting was highlighting the few little misaligned seams and she understandably had a couple of tucks. It happens to the best of us!
So now I'm ready to iron and baste it for quilting. I plan to do a simple meander.

This is the little top down baby sweater I've been knitting from some yarn that was given to me. It is very soft and seems to be cotton.

Wednesday, August 22, 2012

Long lost family

Two aunts and and an uncle stopped by for a quick visit on their way through Bathurst today, bringing me this little quilting gift. The aunts are two of the younger sisters of my dad. He passed away almost 25 years ago.
We've been wanting to get together for ages as we share a love for quilting and crafts, but live too far away.
It was lovely to see them! It just makes me want to plan a trip!

Tuesday, August 21, 2012

More lavender sachets

I just sat down with my afternoon snack and to do the hand sewing on the seams of these lavender sachets. The one on the left and two on the right were printed on silk organza sheets. I like them better than the ones printed on the regular printer fabric sheets. I want to take them down to the shop when I'm out tomorrow.

I put this granny square block together a while ago and thought I might make enough to make a baby quilt. Today, I decided that I needed new sofa cushions, so I put a border around it. Now I need to make another block for the second cushion.

Monday, August 20, 2012

15 minutes of sewing, another lavender sachet

Yesterday, I printed some of my fiber art pieces onto printer fabric sheets in two different sizes.

I didn't have much sewing time today, but I did sit down long enough to stitch up a sample of a lavender sachet. The one I showed the other day was made from a piece of fiber art and a bit labor intensive to sell.
Sorry, I forgot to turn the photo during editing. I don't know how to remove it from this program I'm using for the I pad; I must look into it.
These I can make more of and sell for a better price. The one shown above is about 3 by 4 inches. I've even attached one of my little tags.

Saturday, August 18, 2012

Little finishes

This morning, I went to the market with my mother in law and picked up some sour dough bread and farm vegetables. Then, at lunch time I cut up turnip, carrots, potatoes, cabbage and string beans for a vegetarian stew. I use a vegetable broth and tomato juice to simmer it in. Later, I will thicken it, add a can of navy beans, and maybe make dumplings.
After lunch, I got to work at using up some of my odds and ends.

I again used the little mug rug as a practice piece. For the first time ever, I sewed the binding on by machine. I followed a good tutorial at Red Pepper Quilts blog. Check her sidebar for the tutorial.

http://www.redpepperquilts.com/

The back isn't too bad. Not sure I'd do it on a quilt but it's great for these little rugs. I think though that I would try a narrower binding so the seam on back would be closer to the edge. I used 2 1/4 and ironed and pinned.

Just thought I'd show you this idea for gift tags. First, I cropped photos of my fiber art, imported them to a Printshop program, and arranged them on the page. Then, I printed it off on card stock to make little tags.

This a shopping bag from a store that had a logo sticker on the front. I glued one of my tags on top. Now I can use it as a gift bag.

Next, I did some black thread sketching around another one of my gelatin mono prints. I didn't use a stabilizer; I just stretched on it as I went. It ironed flat afterwards as its not heavily stitched.

I sewed it into a lavender filled sachet.

This is the back view.

Finally, I added color to the flower on this mono print using the Neocolor II crayons. I think I might make another bag with it. The one I showed the other day is sold already!

Thursday, August 16, 2012

Dump and sew

I'm borrowing the expression 'dump and sew' from Beth at the Love Laugh Quilt blog. She describes her method here:

http://lovelaughquilt.blogspot.ca/2012/08/dump-and-sew.html

I've used the method often when I feel like playing with fabrics and no particular design goals in mind. I like the name she gives it though. It reminds me of how kids play by dumping out the toy box.
In a recent post she talks about having a mini 'dump and sew' to make pot holders.

This is my container of scraps. I have another box that I've cut into strips or squares but this is where I throw small pieces that I'm too lazy that day to cut up.

In it I found 6 little crazy patch blocks that I'd done on another dump and sew day. I put them together and added 4 borders log cabin style to make a mug rug. I think they're fun and make a great gift.

Then I decided I should try out a machine quilted feather. I've bought a couple of books on the topic but never tried them out. You might think it's a bit labor intensive for a little mug rug and you'd be right. However, I just never get around to sandwiching a practice piece so this was an opportunity.
You can see a little wobble here and there and the shape is not perfect but I had fun. I used some colorful Wonderfil thread that I ordered in the spring and hadn't tried out yet. I did have one thread breakage and finally settled on a metafil number 12 needle.

Since the machine was set for free motion I decided I'd have a go at some black thread sketching on a daisy mono print. I've not backed it with a stabilizer as I got the idea to make some little lavender sachets with some of my small prints. I want them to be soft and more breathable.
It too is labor intensive. I thought of outlining with a black pen but like the look of the stitching. In the future, I'll use a method taught by Kelli Perkins. I'll do a mono print on paper, thread sketch it, scan it and print it out on fabric as many times as I want.
I could scan this too. For now I'm having fun practicing my stitching and using up bits and pieces.

Wednesday, August 15, 2012

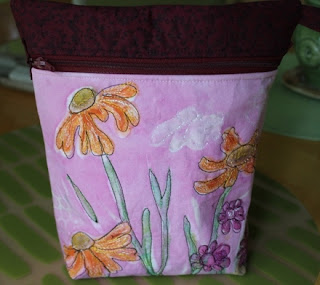
finished zippered pouch

This morning, I did my habitual Wednesday swim, did an errand, and ate lunch with a friend. Once home this afternoon, I put  the finishing touches on the zippered pouch.
There is a little grab tab on one side.
I think it's a fun way to use up some unfinished art pieces. This way it's a useful item with a bit of art on it.
When I was sewing yesterday with my window open to the breeze, there was so much bird song and activity in the yard and at the birdbath, that I had to keep stopping to take pictures. If you're not a bird lover, you could skip the rest of the post.
First there was a female woodpecker.
A family of grackles came along, the parents first. When the babies got demanding, the parents left them to themselves.

I swear this same robin came several times. And, it splashed about at first but then it just sat in the water for a while. I wonder if the heat affects them too.
This flicker was in the bird bath too at one time but I was only able to get it afterwards. Notice the robin? A few seconds later, It was chased away by the flicker.
No wonder I don't get a lot done! I'm too busy getting distracted by the birds and running from window to window to get pictures.


Tuesday, August 14, 2012

A zippered pouch

This morning I sewed the binding onto my birches piece. Once I've finished hand sewing it down I'll post a final picture.

While cleaning I came across this unfinished piece and pondered what I could do with it.

After searching a bit on line, I found a tutorial for a zippered bag and got inspired.

http://luannkessi.blogspot.ca/2009/12/quilted-zipper-bagtutorial.html

After adding fabric for the back, I sandwiched it, lined it and free motion quilted it with black thread. Many times I've salvaged what I thought was a sort of blah piece by adding some lose free motion outlining in black.

Here is the inside with the zipper sewn in and ready for the side seams.

Saturday, August 11, 2012

Binding

I'm sure you're all sick of seeing the birches. I'm almost done, I promise. I've finished all the free motion work and almost finished the hand embellishing.

I thought I would try a binding with an accent color. Following some comments, I chose a lighter binding for the main color and a gold accent color. I don't think it works. Maybe I'll go back to one of the blacks. If I want to keep the gold, I'll have to snip it all off, as that's all I had.
Or, I could more easily switch it so the gold is on the outside. Decisions, decisions.

This binding with an accent is something I recently learned. As you can see in the photo, two colors are stitched together, one is cut at 1 3/4 inches and the second one is cut at 1 3/8, depending on which one you where. Once they're sewn right sides together, you fold it and iron it wrong sides together just like a regular binding.
It needs to be sewn to the back of the quilt and wrapped to the front so that the accent color shows next to the quilt. The idea is to stitch in the ditch. I'm not very good at that so I'm not sure if I'll stitch it by hand. I have a friend with a foot for stitching in the ditch which I may borrow.

This morning I went to a craft sale at the waterfront where I picked up this concrete garden stone made in the shape of a rhubarb leaf. I plan to set it into the stone path near my back door.

Thursday, August 9, 2012

Adding silk ribbon leaves

Today, I added more of the red dogwood bushes. Not sure I like how they ended up being evenly spaced. Also, my open toed free motion foot snapped. I have to use the regular one, making it difficult to see my stitching lines. I'm not quite finished all the brown branches on the left side.

Ive been quietly sitting and stitching some fallen leaves with silk ribbon.

Wednesday, August 8, 2012

Finally some stitching

Well, we've had a great couple of weeks while my husband was off. Lots of sun and heat. Today he went back to work. It isn't too hot, so I was happy to get something done.

I ironed some fusible to three scraps of fabric for some foreground leaves. Then, for texture, I took some watered down paint and splattered it on using a toothbrush. As you can see I cut each leaf out individually. I had to pick each paper backing off with tweezers before I could iron them on. The things we do for art!

I stitched all the leaves down, added a line of fiber with gold flecks in it and stitched more of the red bushes. The picture above just shows a section of the piece.
It's coming closer to being finished. I've chosen a couple of binding options, and I'm just trying to decide if I should add a small highlight with red maple leafs.

I'm thinking of using one of these for the binding. I have a couple other black and whites I'll audition as well.
Finally, I feel like I'm getting somewhere. It's nice to be off. But good to be back at my routine.

Sunday, August 5, 2012

same old story, hot and muggy

I'm sure you've noticed a certain lack of blog posts and a definite lack of sewing. It is still desperately hot and humid. My husband has been on vacation for the past two weeks as well. At least we've been able to escape the heat at the beach when we needed to.
On Friday night it was so hot and uncomfortable, we brought our supper to the basement and watched a movie. It was called Fly Fishing in Yemen, a British movie which I highly recommend if you'd like something light with a bit of British humor and some lovely photography. Perfect for summer viewing.

This is what I've been doing as much as possible to escape the heat.
Gord returns to work on Wednesday, but I may not have much to blog about until this heat breaks.

Saturday, August 4, 2012

Another hot sunny day

It's just too hot to even think about sewing. We're heading to the beach.

I just grated fresh garden cabbage and carrots for coleslaw. Picked them up at the Beresford market this morning.

Thursday, August 2, 2012

Zippered bag

I sewed the binding on my birches piece this morning. I'll take a final picture once I finish hand sewing it down.

As I often do when I'm not sure what I'll do next, I cleaned and organized my space. This piece has been tacked on my wall for a while. I wasn't happy with it, but I remembered what a loose outline in black stitching could do for a piece. So, why not? I wasn't going to finish it as it was.

Then I found a tutorial on line for a zippered bag.

http://luannkessi.blogspot.ca/2009/12/quilted-zipper-bagtutorial.html

I sewed on a piece of coordinating fabric for the back, sandwiched it, added lining and free motion quilted it. I actually used the black stitching as the quilting. The back is meandered.

Here you see it inside out with the zipper added . It is waiting to be stitched down the sides.

I always like what a loose line of black free motion stitching can do for a sort of blah design.